
TL;DR: The clothing manufacturing process converts an approved product idea into repeatable bulk garments through controlled files, samples, materials, cutting, sewing, finishing and inspection. A&J International Apparel has manufactured womenswear in Dongguan, China since 2006 with a 50-piece minimum per style. Each stage should produce a signed output before the next stage begins.
The clothing manufacturing process is not one long sewing operation. It is a chain of decisions in which an unclear input becomes an expensive correction later. A sketch cannot release fabric, an attractive sample cannot replace a graded pattern, and a finished garment cannot prove that every bulk unit follows the same specification.
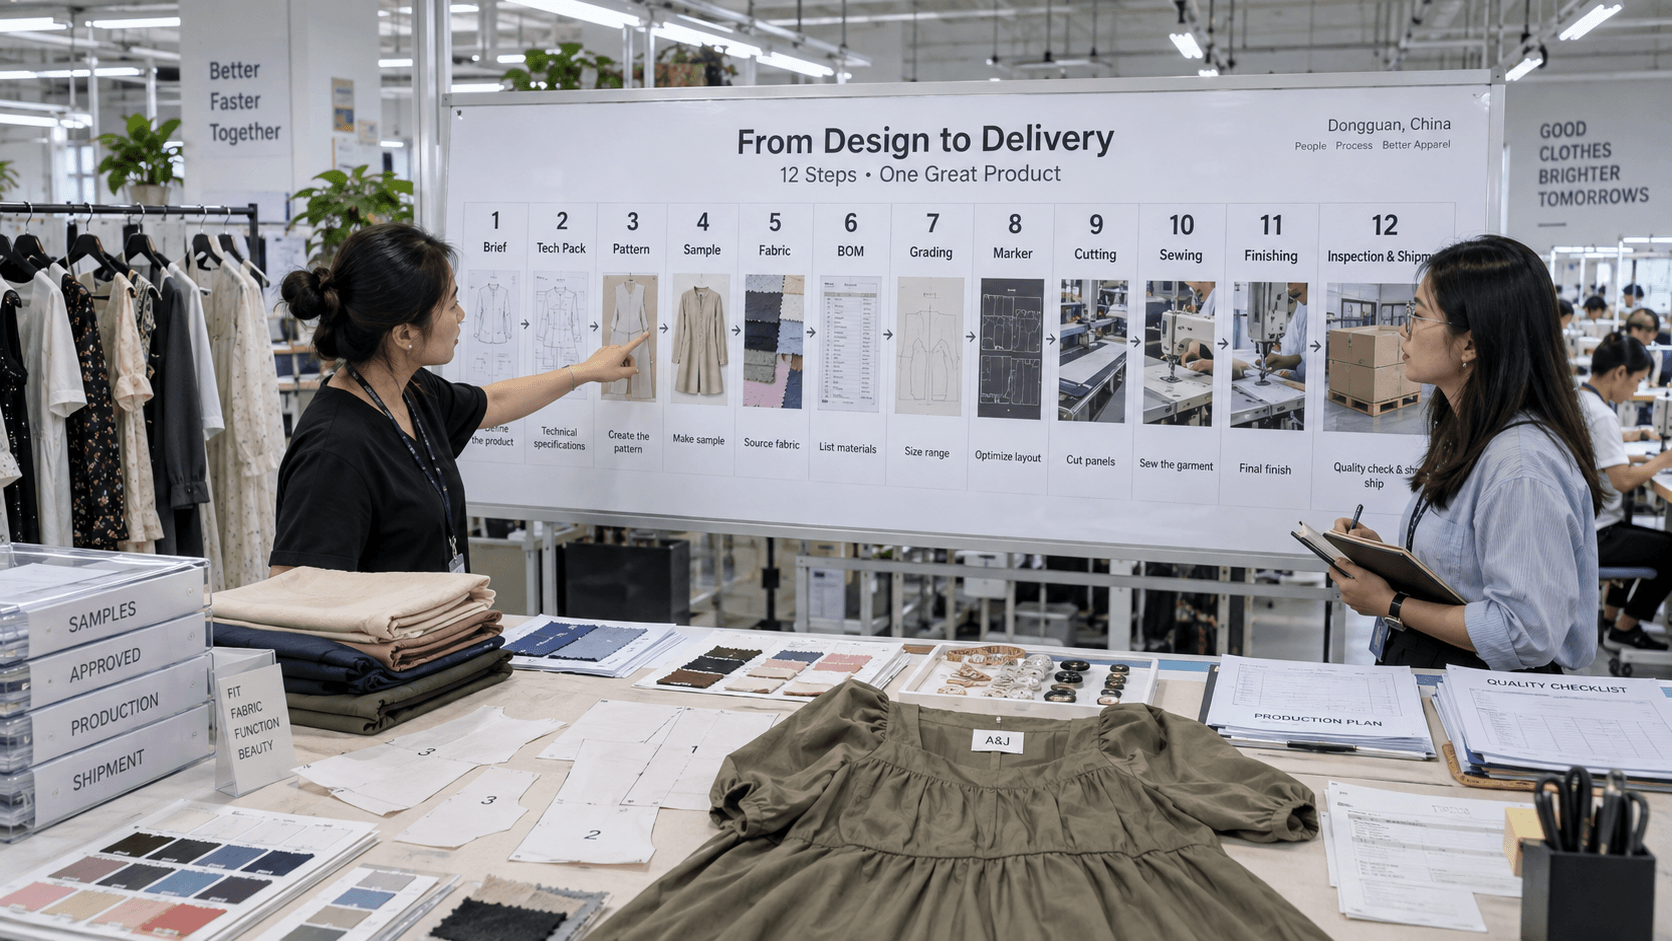
This clothing manufacturing process guide follows 12 stages from requirement freeze to shipment records. It explains what the brand supplies, what the factory produces, which checks release each stage and where development should stop when evidence is incomplete.
Clothing Manufacturing Process: The 12-Stage Map
A controlled clothing manufacturing process has four connected phases: product definition, development approval, production preparation and bulk execution. The phases overlap in planning, but their release gates should remain distinct.
| Phase | Stages | Required release |
|---|---|---|
| Product definition | 1-2 | Product brief and technical pack |
| Development approval | 3-6 | Approved pattern, sample, materials and size set |
| Production preparation | 7-8 | Sealed pre-production sample and cutting authority |
| Bulk execution | 9-12 | Sewn goods, finished goods, inspection report and shipment file |
A factory should be able to identify the current stage without saying that the order is simply “in production.” If the pattern is approved but colour is not, those are two different statuses. If cutting has started before the pre-production sample is sealed, the clothing manufacturing process has crossed a gate without evidence.
The clothing manufacturing process should assign one approval owner for fit, one for visual identity and one for commercial release. These roles may belong to the same person in a small brand, but each decision still needs a date and version number.
Stages 1-2: Freeze the Product Brief and Technical Pack
Stage 1 defines what is being made. Record garment category, wearer, use case, silhouette, size range, target material, colour count, decoration, destination market, care expectation, target quantity and delivery window. A reference image can explain mood, but it cannot define construction or ownership.
Stage 2 converts the brief into a technical pack. The clothing manufacturing process needs flat drawings, measurement points, construction notes, bill of materials, colour references, artwork positions, label content, packaging instructions and revision history. Missing values should be marked “to be confirmed,” not silently filled by whichever operator receives the file.
Our tech pack for clothing guide explains the required sections. The related OEM vs ODM clothing guide helps determine whether the brand or supplier controls the starting design assets.
Release gate: the brand and factory confirm one numbered technical-pack version. Any later revision must identify the changed page, reason, owner and date.
Stages 3-4: Develop the Pattern and First Sample
Stage 3 translates two-dimensional specifications into pattern pieces. The pattern maker sets balance, ease, seam position, shaping, opening size and assembly allowances. A clothing manufacturing process becomes unstable when a factory changes measurements without updating the pattern or changes the pattern without updating the measurement chart.
Stage 4 produces the prototype or first development sample. Its purpose is to expose decisions, not to imitate bulk efficiency. Review silhouette, movement, balance, construction feasibility, material behaviour and decoration location separately. Write comments against measurable points. “Make it nicer” is not an actionable correction; “reduce front neckline depth by 1 cm” is.

A first sample rarely proves colour, production fabric, all sizes and packaging at once. Our clothing sample cost guide separates pattern, sewing, fabric, trim and colour-development charges so the buyer can see what each round is paying to resolve.
Release gate: approve the corrected base-size pattern and sample comments before grading. If the fit direction is still changing, the clothing manufacturing process should not multiply that uncertainty across sizes.
Stages 5-6: Approve Materials and Grade the Size Range
Stage 5 locks production materials for the clothing manufacturing process. Confirm supplier reference, composition, weight, usable width, stretch direction, recovery, shrinkage, colour, surface, hand feel and care response. Trims require the same discipline: elastic force, zipper specification, button size, lining, thread, labels and packaging must have identifiable references.
A swatch approval is not automatically a production-lot approval. The clothing manufacturing process should define whether bulk fabric needs a shade band, roll inspection, dimensional test, colourfastness test or lab report. A change in fibre blend, finish or mill can change sewing behaviour even when the colour looks similar.
Stage 6 grades the approved base pattern into the planned size range. Grade rules should follow product geometry rather than adding the same amount everywhere. Shoulder, bust, waist, hip, rise, sleeve and length may require different increments. Check at least one larger size physically before releasing the full range when fit risk is high.
AATCC textile test methods and resources provide structured procedures for textile evaluation. Test names and acceptance criteria should be written into the clothing manufacturing process instead of recording only “pass.”
Release gate: approved material references, test requirements, graded nest and size-set decision are attached to the current specification.
Stages 7-8: Seal the Pre-Production Sample and Prepare Cutting
Stage 7 creates the pre-production sample from approved or production-representative materials. It should combine the current pattern, construction, colour, trims, labels, artwork and finishing route. This garment becomes the physical reference for bulk, so unresolved substitutions must be listed rather than hidden.
The clothing manufacturing process uses the pre-production meeting to align merchandising, pattern, cutting, sewing, decoration, finishing and quality teams. The clothing manufacturing process should record special operations, measurement tolerances, critical visual points, inspection method and defect examples. Operators need one released instruction set, not separate messages from multiple people.
Stage 8 prepares the marker and cutting plan. Confirm fabric width, nap or one-way direction, stripe or print matching, shrinkage allowance, lay length, defect zones, bundle size and size ratio. Relaxation may be needed before cutting, especially when stored tension can change dimensions after the fabric is opened.

Numbered bundles protect size, shade and component matching as cut pieces move to sewing. The clothing manufacturing process should prevent parts from different shade groups or incompatible lays from being mixed.
Release gate: the sealed sample, marker, lay plan and material inspection are approved before the first bulk cut.
Stages 9-10: Sew, Decorate and Control Work in Progress
Stage 9 assembles the garment through an operation sequence. The line balances work across machines and skills so that one difficult operation does not accumulate unfinished pieces. First-off checks should confirm seam type, stitch density, allowance, tension, alignment and measurement before the full bundle proceeds.
In-line quality control keeps the clothing manufacturing process from carrying local defects into later operations. Inspect critical operations at their source: neckline shape after joining, pocket placement after attachment, zipper alignment before closing the lining, elastic extension before final cover stitching and matching points before side seams are completed.
Stage 10 applies print, embroidery, heat transfer, pleating, washing or other decoration at the stage suited to the method. Some artwork belongs on panels before assembly; other decoration belongs on completed garments. The clothing manufacturing process must preserve registration between pattern pieces, artwork files and size variants.
| Control point | Evidence | Stop condition |
|---|---|---|
| First-off operation | Signed construction specimen | Wrong seam, tension or allowance |
| In-line measurement | Measurement record by size | Trend moving outside tolerance |
| Decoration | Approved strike-off or stitched sample | Colour, scale or position mismatch |
| Bundle identity | Size, shade and quantity ticket | Mixed sizes or material lots |
A&J uses this stage-gate logic for womenswear programmes, but the principle applies to any factory. The guide to finding a clothing manufacturer explains how sampling accuracy, communication and schedule honesty can be evaluated before bulk commitment.
Stages 11-12: Finish, Inspect and Build the Shipment File
Stage 11 covers thread trimming, pressing, washing where specified, stain removal, shape setting, final measurement and packaging preparation. Pressing should restore the intended shape rather than force a poor seam into temporary alignment. Care labels, main labels, size labels, hangtags and packaging marks need content and placement checks.
Stage 12 performs final inspection against the purchase order, sealed sample and approved specification. The clothing manufacturing process should define inspection scope before goods are packed. Check quantity, workmanship, measurements, colour, decoration, labels, packaging and carton marks. Record defects by type and size instead of giving only an overall impression.

The clothing manufacturing process ends with a shipment file containing the final specification, material references, approved sample record, inspection report, packing list and agreed ownership files. This archive supports repeat orders because the factory can distinguish a true repeat from a visually similar reconstruction.
OEKO-TEX STANDARD 100 covers textiles tested for harmful substances. Its scope is different from workmanship inspection or factory-management systems. Our certified womens clothing manufacturer guide explains how to verify certificate scope rather than relying on a logo.
Release gate: authorised inspection result, packing list and shipment documents match the approved order.
How Long Does the Clothing Manufacturing Process Take?
Timing depends on product complexity, material availability, approval speed, colour development, sample rounds and factory capacity. A useful schedule separates active work from waiting for buyer decisions.
| Stage group | Typical planning range | Main delay driver |
|---|---|---|
| Brief and technical pack | 1-3 weeks | Unresolved product decisions |
| Pattern and samples | 3-8 weeks | Fit revisions and material changes |
| Material and pre-production | 2-6 weeks | Fabric, colour and trim lead times |
| Cutting through finishing | 3-8 weeks | Quantity, operations and decoration |
| Final inspection and dispatch | 3-10 days | Rework, documents and booking |
These ranges are planning references, not promises for every style. A clothing manufacturing process can move faster when materials are available and approvals arrive in one consolidated response. It slows when the design continues changing after grading, artwork or cutting.
A brand should ask for a dependency schedule rather than one delivery date. The schedule should show what the factory is doing, what the buyer must approve and which later stages move if that approval is late.
Where the Clothing Manufacturing Process Should Stop
Stopping is a control action, not automatically a failure. Pause before pattern work when the design brief is contradictory. Pause before grading when the base fit is unresolved. Pause before cutting when bulk material differs from the approved sample. Pause before shipment when inspection evidence does not match the agreed standard.
A blank-garment decorator is more suitable when the product needs only stock-body printing and very rapid fulfilment. A specialist knitwear facility is more suitable for fully fashioned garments. A regulated product specialist is needed when medical or protective claims exceed ordinary fashion manufacturing.
A&J International Apparel operates a cut-and-sew womenswear clothing manufacturing process in Dongguan, China. We are suited to brands that can approve product files, samples and production evidence in sequence. We are not a substitute for unresolved design work, single-piece fulfilment or regulated medical-product engineering.
Seven Controls That Keep Production on Track
- Use one version register. Give every specification, pattern and artwork release a number and date.
- Separate visual and technical approvals. Colour approval does not equal fit approval.
- Name the decision owner. Record who can release fit, materials, artwork and shipment.
- Freeze before multiplying. Approve the base pattern before grading and the graded set before bulk cutting.
- Test the production route. Use representative fabric, trims, decoration and care treatment.
- Stop at evidence gaps. Do not let schedule pressure turn an unanswered question into an operator assumption.
- Archive the final state. Keep the sealed sample record, bill of materials, inspection file and ownership documents for repeats.
These seven controls make the clothing manufacturing process traceable. They do not remove every production variation, but they make deviations visible early enough to manage.

Frequently Asked Questions
What are the main stages of the clothing manufacturing process?
The main stages are product definition, technical pack, pattern, sampling, material approval, grading, pre-production approval, cutting, sewing, decoration, finishing and final inspection.
When should bulk fabric be ordered?
Bulk fabric should be ordered after composition, weight, colour, performance requirements and commercial terms are confirmed. Cutting waits for production-lot checks and the released marker.
Why is a pre-production sample required?
It combines the current pattern, production-representative materials, trims, artwork, labels and finishing route into one physical reference before bulk cutting begins.
Who approves each clothing production stage?
The brand assigns approval owners for fit, visual identity and commercial release, while the factory records technical checks and stage outputs against the released specification.
Can I begin a 50-piece run while fabric, labels and the final size chart are still being approved separately?
No. A 50-piece run still needs one released material set, label specification and graded size chart before cutting to prevent uncertainty from multiplying across bulk.


Leave a Reply